Tiling in a Camper / Custom Shower Build
- ashtonjaqueswhaley
- Mar 5, 2020
- 6 min read
Okay, so this is probably the most asked question of anyone wanting to revamp their travel trailer: "how
does one successfully tile in a camper that will constantly be flexing and on the go?"

This was a biggie for us. Since we would be living full-time in ours, we really wanted the amenities of a "home home", PLUS my husband seems to be a lover of all pot-holes in the road (seriously, I call him a #potholemagnet) so we needed something that could seriously last and bear with us through those long cross-country treks.
Anyways, now that we've lived in Honey for the past 6 months, taken way over 200 showers & towed this big girl nearly 6,000 miles we feel confident enough to share with you the products we used. We are not sponsored (although I wish we were); we just really loved these companies and the products. Below, DJ + I have gone into detail about the custom shower build, tiling, and mistakes we made that can maybe be useful to you! Feel free to skip to the section you're interested in as it gets a little long😅


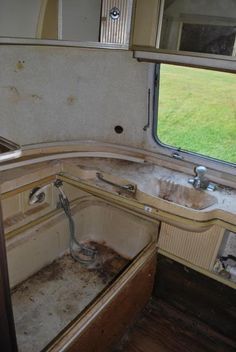
Note: the picture on the right is not ours. Unfortunately, ours was actually much worse than this and I forgot to snap a pic. Credit here
THE SHELF BUILD
For our rear bath we had a few things going on: 1. Our original shower pan was in no condition to keep or restore
2.We had to hide our kitchen and bathroom sink drains in our shower build (like it was originally in 1972) 3. We wanted our shower as low to the ground as possible so that DJ didn’t hit his head #tallpeopleprobs so we moved our shower drain site (pre-plumbed under subfloor like all of our plumbing) as the original drain was much higher. To address the issues we decided to build a corner shelf to cover the drain pipes, and alter a Schluter shower pan to fit our odd camper, after a suggestion from a few friends on IG (thank you Alex Dykstra + Nathan Lubbers). Here is the exact one we purchased at Floor & Decor here: we bought the 38" because it worked best with where our drain was plumbed. The best thing about this product is that you can cut it to whatever shape you need as it is PRE-SLOPED. Yes, you heard correctly. They are made of an expanded polystyrene (EPS) foam with a high compressive strength that seriously upholds in a camper, and IMO is a much safer option that a heavy mortar bed that could crack easily BUUUT I'll get back to this.
Our first step was building the shelf. We thought about adding a bench, but ultimately wanted more standing room. Plus, who has time to sit when your 5 gallon hot water tank goes cold within 15 minutes🥶 (It was free, so I'm not complaining #thankyouKim+J)

If you're wondering what the black peeling stuff is on the ground, that was my attempt to FlexSeal over our already sealed subfloor🙃 Turns out it's not meant to have traffic and should be covered immediately.
This part was pretty straight forward. We measured exactly how tall we wanted the shelf, and cut leftover 2x4s and 1x4s to size. I think ours were roughly 36” tall. Looking back, DJ says we should’ve cut the top of them at a slight angle in toward the shower to promote better drainage, but my suggestion would be just make a clean slope with thinset. From there we took a 2” hole saw (our drainage pipes were 1 1/2”) to cut holes in the 1x4s where our kitchen/bathroom sinks drainage pipe would flow to making sure to maintain the angle to continue draining. We then attached the 1x4s to the wall by using leftover 3" metal track bent to work like L brackets and multiple L brackets at the bottom for stability. There's probably a smarter way to do this, buuuuut😅 We then took a sheet of scored MDF (available on amazon for cheap-we searched Flexible MDF board) and placed it up against the 1x4’s and ran a screw into them to secure. For the top portion we made a template using butcher block paper and then cut the shape out of paneling we bought from Home Depot or Lowe’s and secure it when a screw into each 1x4 like shown below.

THE PAN + WATERPROOFING
The Schluter system I mentioned above comes with a few things: the shower pan, a waterproofing membrane large enough to cover walls, a smaller corner sheets for corners/overlays, and then the pieces needed to waterproof the openings of the shower head and faucet. Schluter’s recommendation is to use thin set to secure/glue everything down. So that’s what we did. We took another butcher block template since our new shower pan shape isn’t a perfect rectangle. Lined up where our drain hole is, and then used a jigsaw to carefully cut out our template for the new shower pan. It’s super important at this part to make sure you don’t cut too much off, if you do you’ll have to purchase another shower pan which is a little pricey (about $100). After cutting the new pan shape we used a very thin layer of thin set, secured it down, and then followed Schluter's recommendation for waterproofing the walls with their product. It’s basically just smearing thin set on everything and placing the waterproofing membrane over it. After it has been secured, make sure there is a really nice defined SLOPE with thinset (even though the pan is pre-sloped). If you're like me, and get really tired of arguing with your husband about all things reno, then you may give in when he says "nahh, I think the slope is fine", but do not. I repeat DO NOT. This was Ashton. #dontbelikeAshton Not only is this extremely important as is, but in a camper you are not always level and water may not drain off the shelf or into drain as easy. This is a problem for us because when we set up, we have to eyeball when our camper is level front to back. We don't always get it just right and who wants to readjust when its 10PM and you just jumped in the shower to see it's not level and draining as fast as it should. Not me, that's who. So a couple of times when we aren't perfectly level, I will wipe up any water left after showering with a towel because I'd hate to leave it and it get gross or something. This has been the only problem we've experienced and I hope you can learn from our little mistake.


TILING

Tiling was something completely new to us, as our first camper reno's shower was in great shape and we used Peel & Stick tiles as a back-splash in our kitchen. We watched COUNTLESS YouTube videos and people made it seem simple. Although, none of them were in a camper. The biggest complaint with tiling in a camper was the same complaint we’d seen with shower pans: the grout and tiles are heavy and crack. After another 3 days worth of research I found a company called FlexTile who offers silicone based adhesive and grout (meaning they’ll stretch and be able to withstand the movement that happens when the camper is rolling down the road.) The first product is an adhesive that you literally apply to the back of the tile like Elmer’s glue and stick it to the surface. Pretty self explanatory. The next
product was their actual grout. It’s also 100% silicone, super stretchy, but also very sticky. It comes in a tube like caulk, so you squeeze it over the tile and then use a rubber float to spread it liberally in the cracks between the tile. From that point you can use a sponge with some soap and water to clean off the excess. It’s very similar to regular tiling, just slightly different in that you need a rubber float, and this grout is SUPER sticky. If you need more guidance, watch this youtube video for a hilarious but quite thorough explanation and tutorial of the products used. Another thing we found helpful was the type of sponge we used. For some reason, only one type of sponge really helped spread the product for us. I checked our amazon orders to find the exact one, but they haven't restocked since we bought them out last spring👀 It was called "filter scourer scrubbers sponges for kitchen bath", but I think the main characteristic that really helped was the coarseness of it's makeup. It wasn't the soft yellow type that you see people wash cars with, more a plastic scouring pad.

Lastly, once you find the perfect soap + water ratio, stick with it, as a change in too much soap or water can hinder the process, and the #1 thing we learned is that while great, this product dries FAST, making it really tacky if not careful.
I hope this all makes sense, I apologize that it’s the length of a small novel. Please feel free to ask any specific questions and I’ll definitely get you an answer!
IF YOU'RE STILL NOT CONVINCED, here is a picture of our kitchen back-splash where we used the same silicone based products. Not only was it glued directly onto the aluminium on one side of our kitchen, it was also done with less than 24 hours to really dry. Yup, we glued and grouted this tile the night before we left to go live full-time. It survived the 5 hour trip from FL to SC with no problem in the first 24 hours of it's life😅


Comments